Fujifilm lent me Fujinon XF80mmF2.8 R LM OIS WR Macro for my recent expedition to Australia. Here is my experience with this lens.
Fujifilm X system started with three lens and one of them was actually macro lens, Fujinon XF60mmF2.4 R Macro – but it was limited to 1:2 ratio, which was a issue for many photographers. Although there were rumors about 1:1 lens for a long time, we had to wait 6 years for it or use some of third party lenses. Now the wait is over and macro enthusiasts can go with Fujinon XF80mmF2.8 R LM OIS WR Lens. Lets take a look on it.
Fujifilm decided to use focal length of 80 mm and it seems to me as reasonable choice. Minimal focusing distance is 246 mm and working distance (from front element to subject) is 98 mm. I used this lens for capturing insects, frogs and small reptiles and working distance was OK for me, but your mileage may vary. It may be better to have a bit longer working distance for some shier animals, but on the other side, longer working distance makes more difficult to work with flash which is used in macro work quite often. Sure, you may have different needs depending on your subjects and workflow.
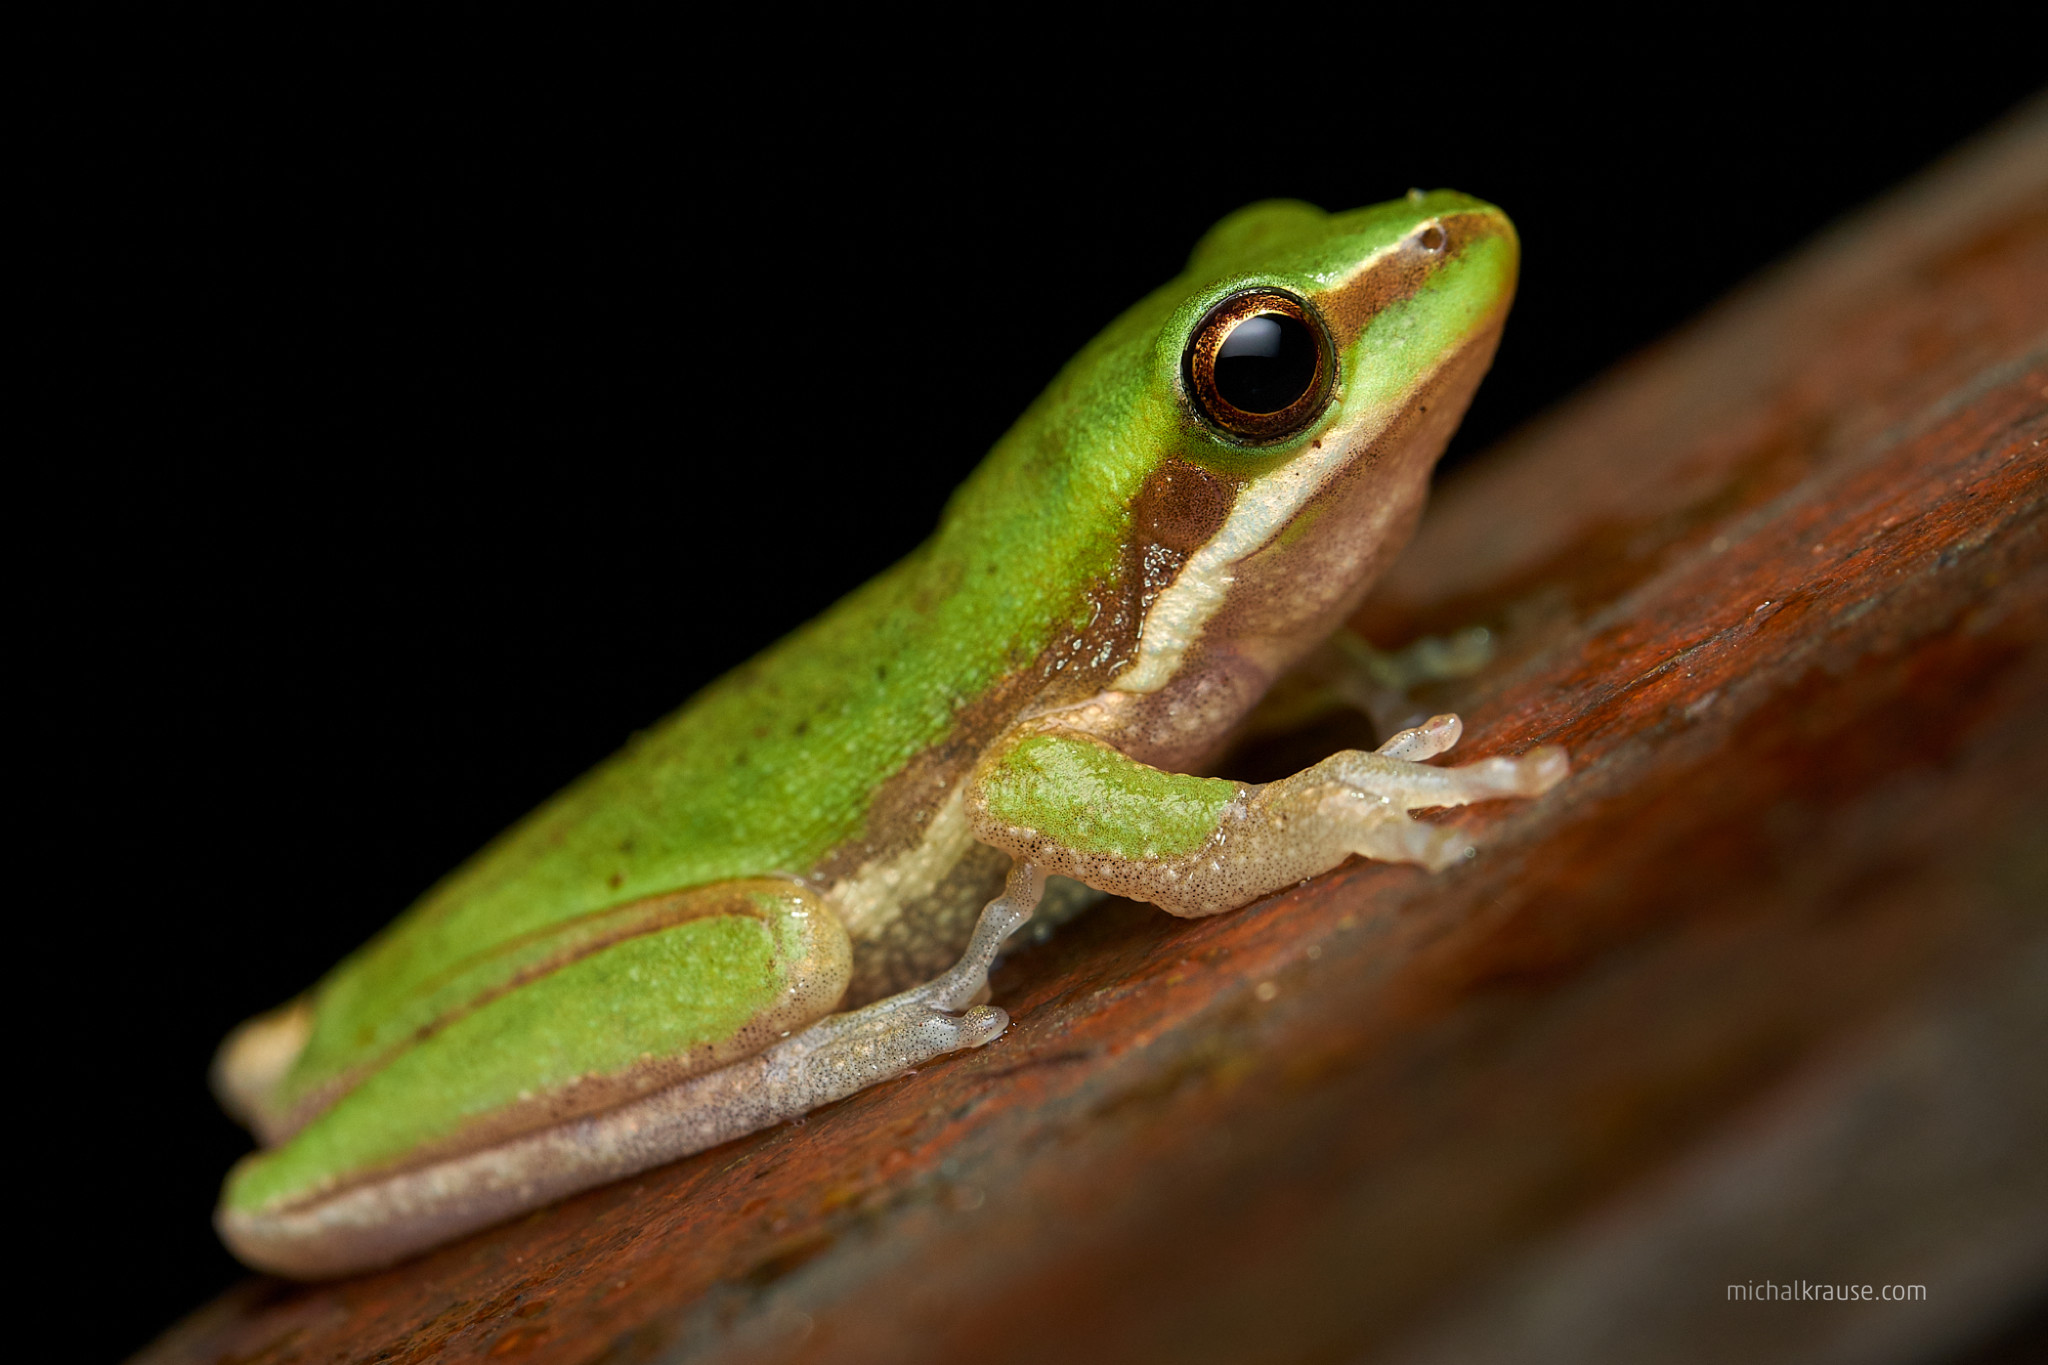
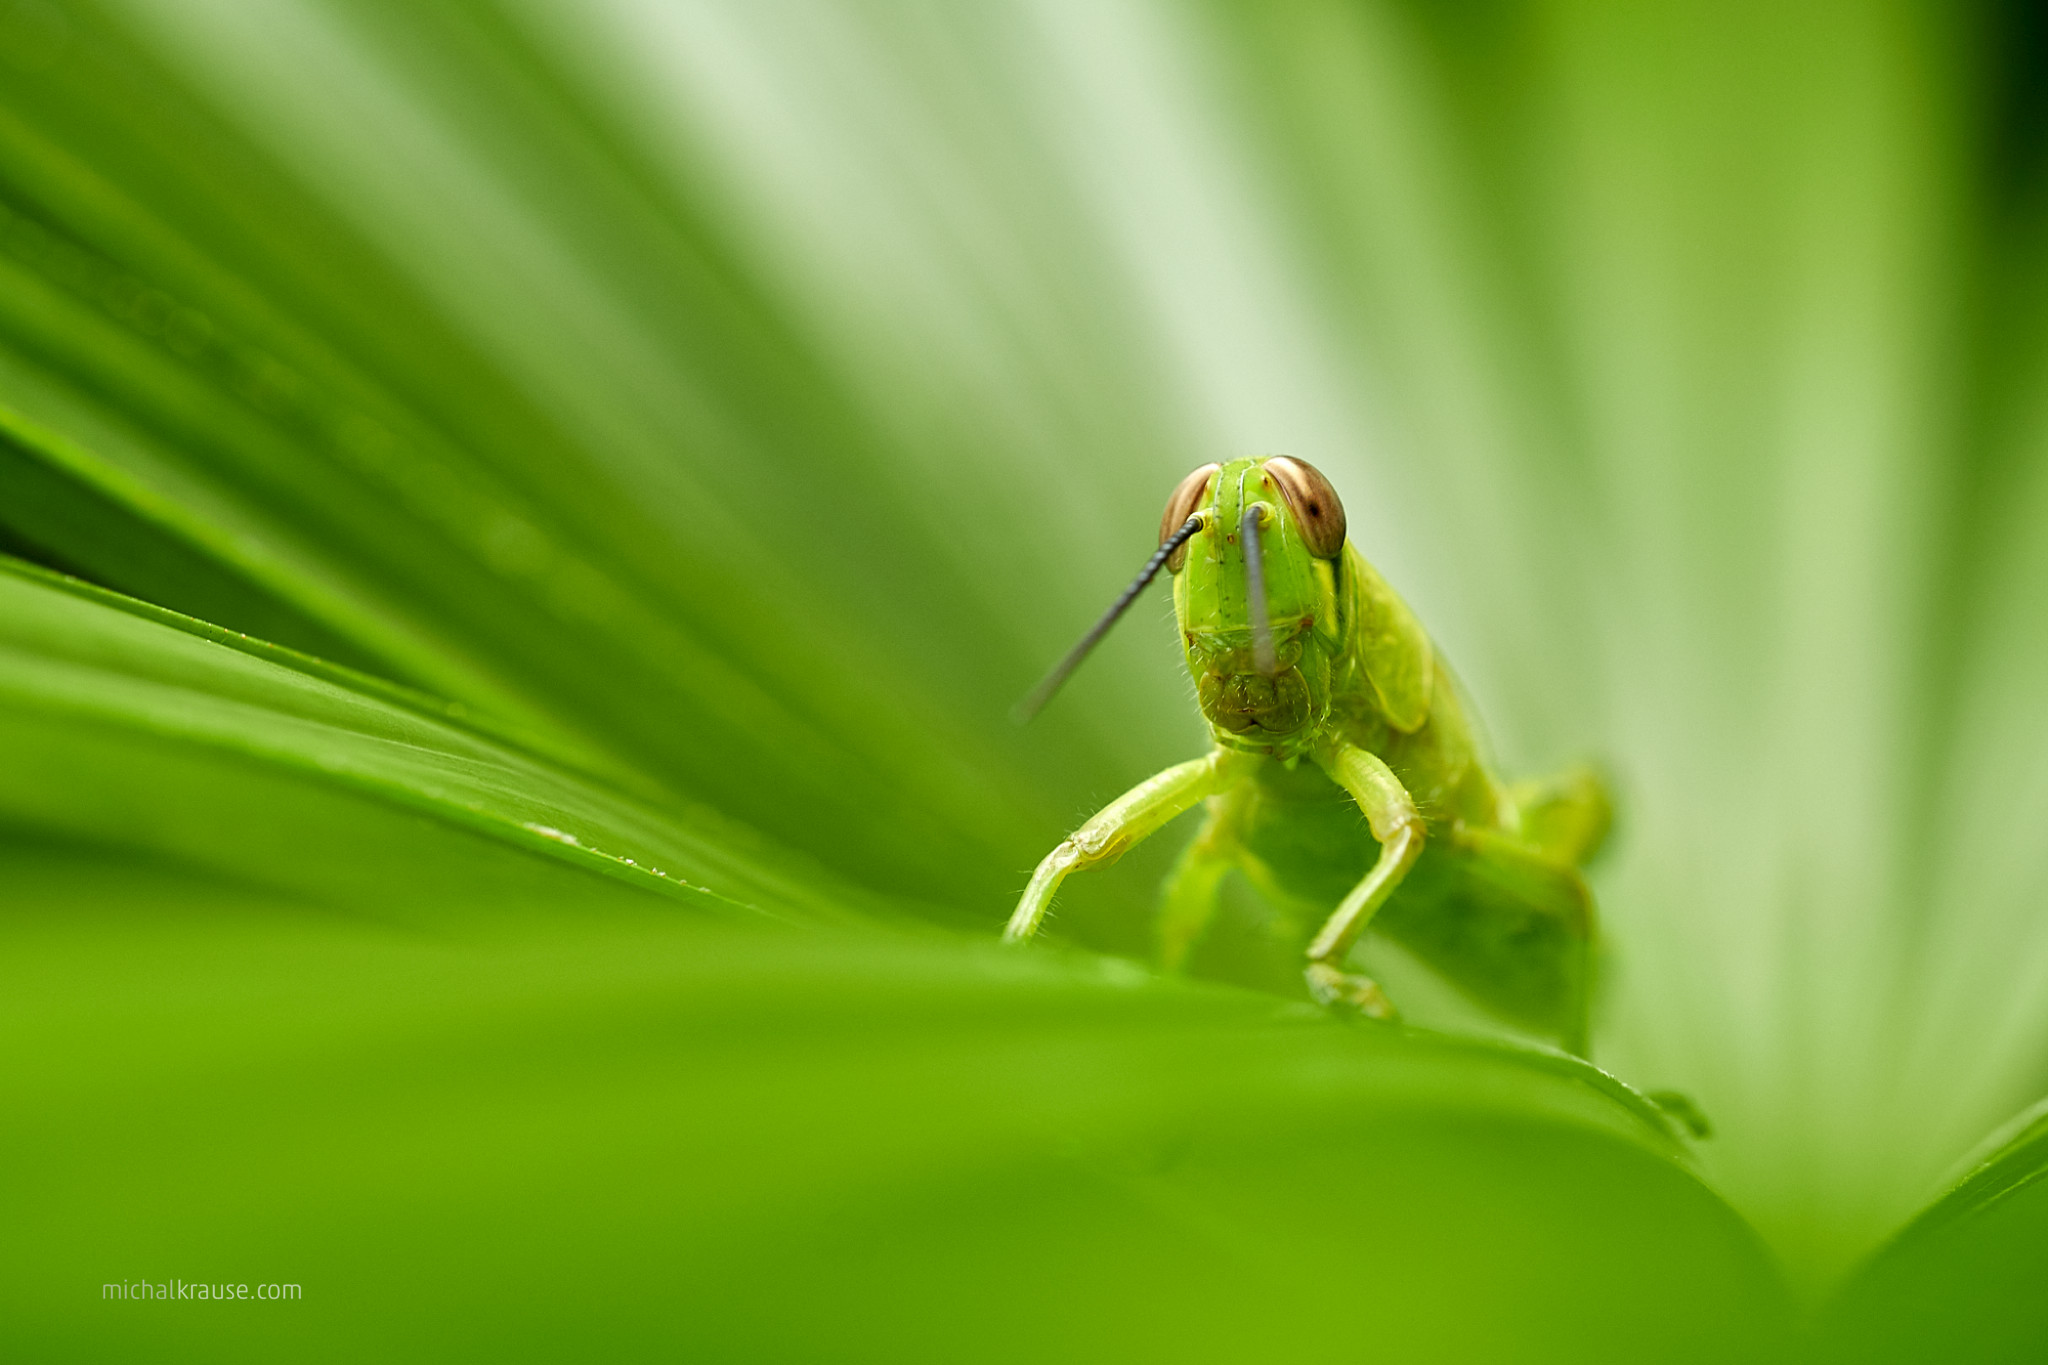
Fujifilm X-T2 + XF80mmF2.8 R LM OIS WR Macro (f/10, 1/250 s, ISO 1250, focal length 80 mm, flash)
In case of doubts whether the frog is a proper subject for testing macro lens, here is the backstage photo:
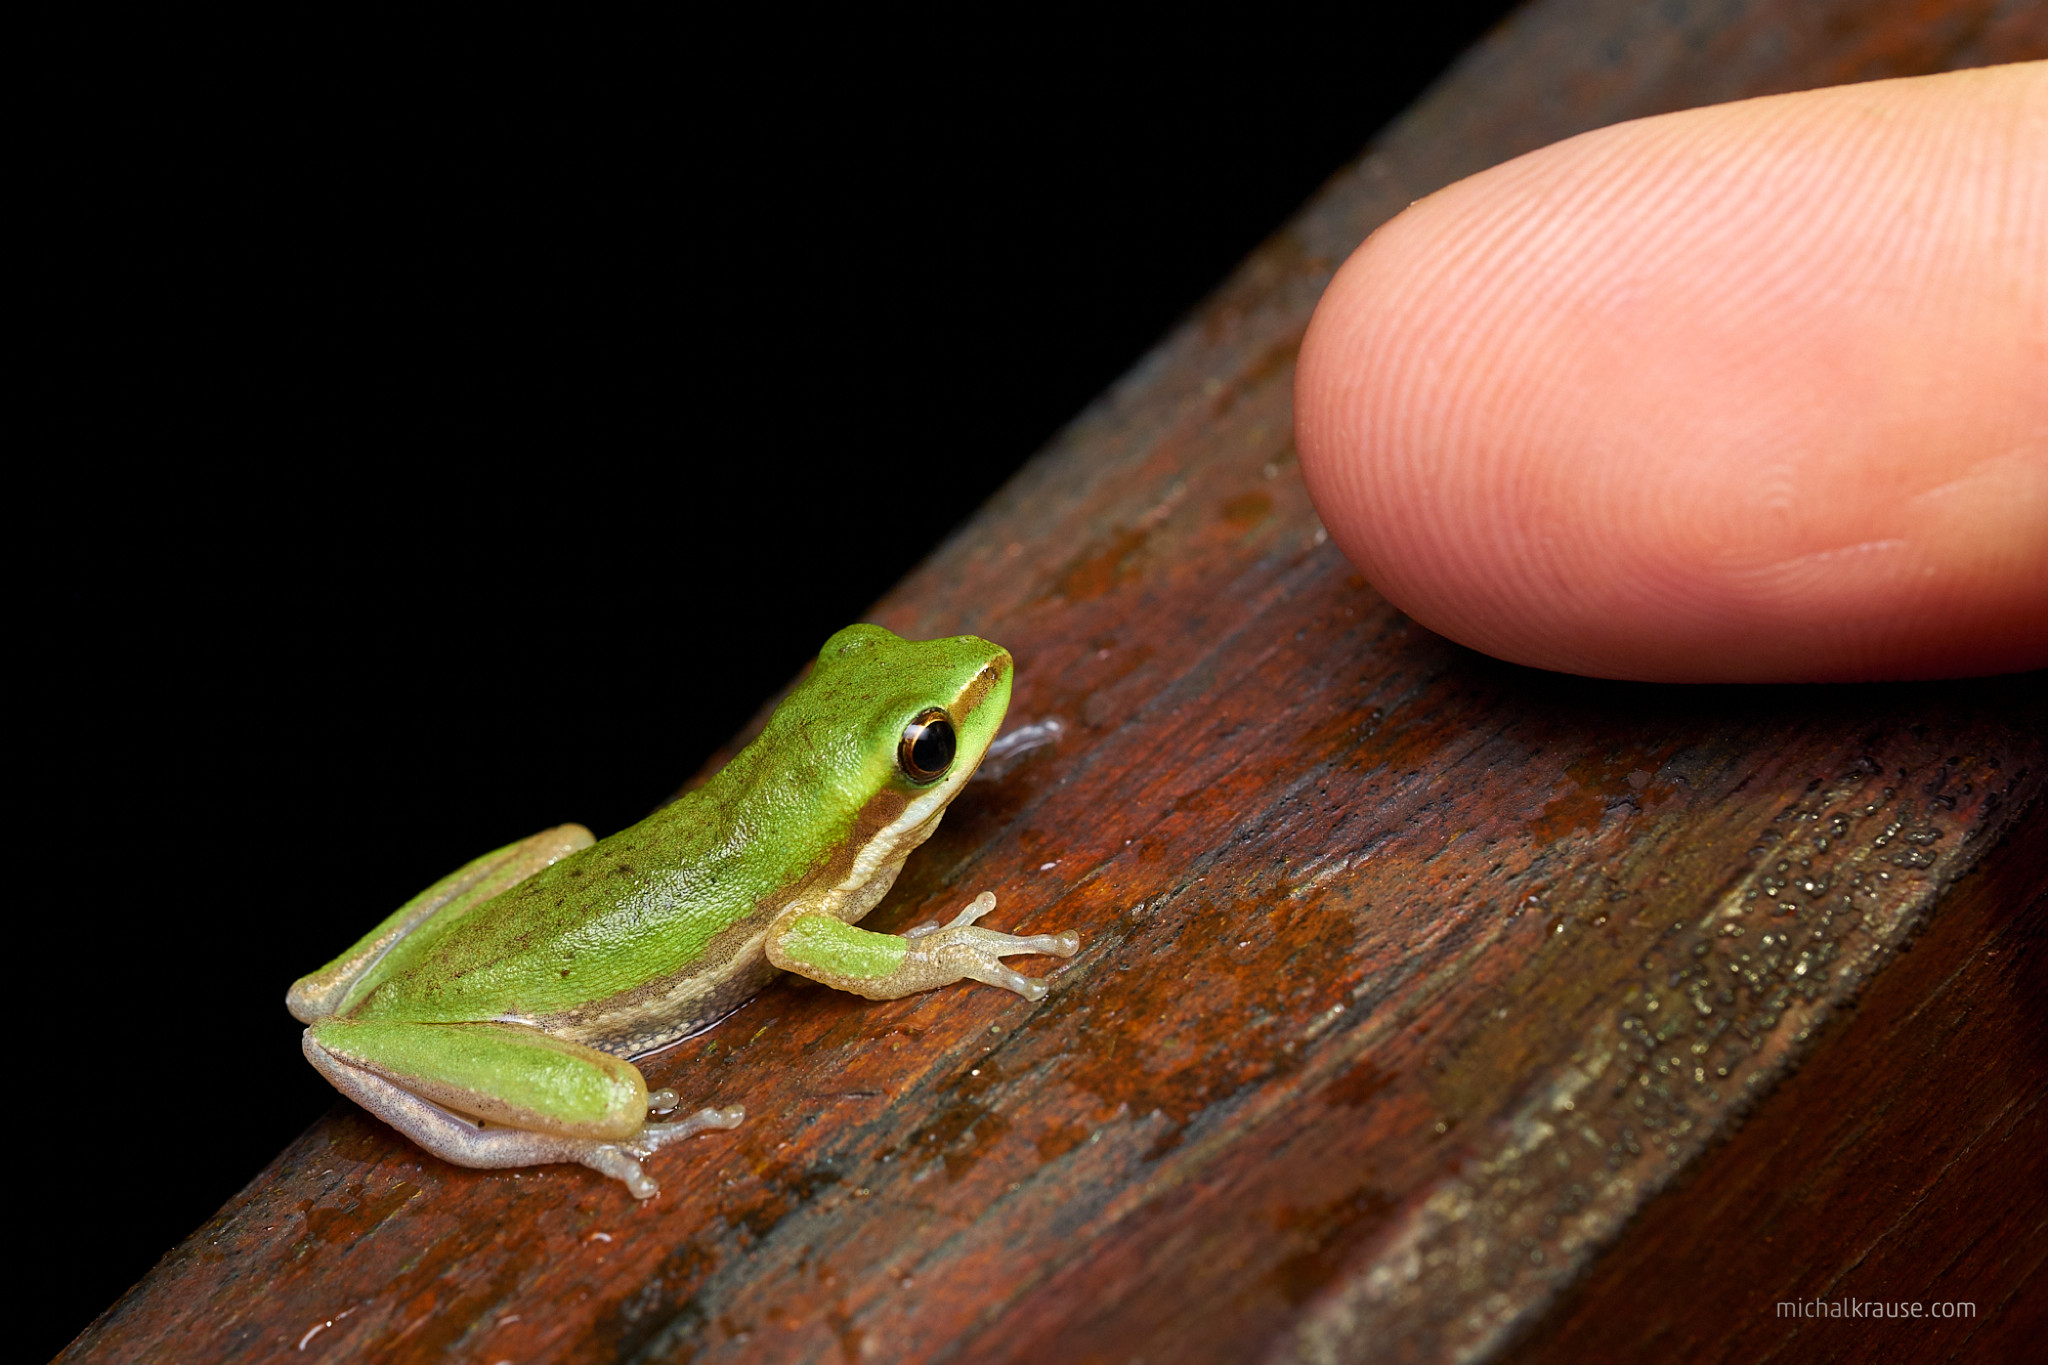
Fujifilm X-T2 + XF80mmF2.8 R LM OIS WR Macro (f/10, 1/250 s, ISO 1250, focal length 80 mm, flash)
I must mention optical stabilization, because it is really helpful in macro photography and moreover, it is first prime Fujinon X lens equipped with OIS which was used only in zoom lenses before. In this case, stabilization achieves 5-stop according to CIPA standard, but I have to say that it depends on shooting conditions. It is not uncommon that you take really complicated positions during shooting macro handheld – the more you bend, the harder it will be to stay stable and even OIS will not help you. I was able to get sharp shots using 1/15 s in quite difficult positions. Longer times would be possible in more stable poses (or with X-H1 camera which has in body stabilization) , but it seems to me that you can achieve full 5 steps (which corresponds to shutter time around 0,5 s) more likely in non-macro range. But OIS definitely helps you to get sharp shots and I was happy to have it in XF80mm.
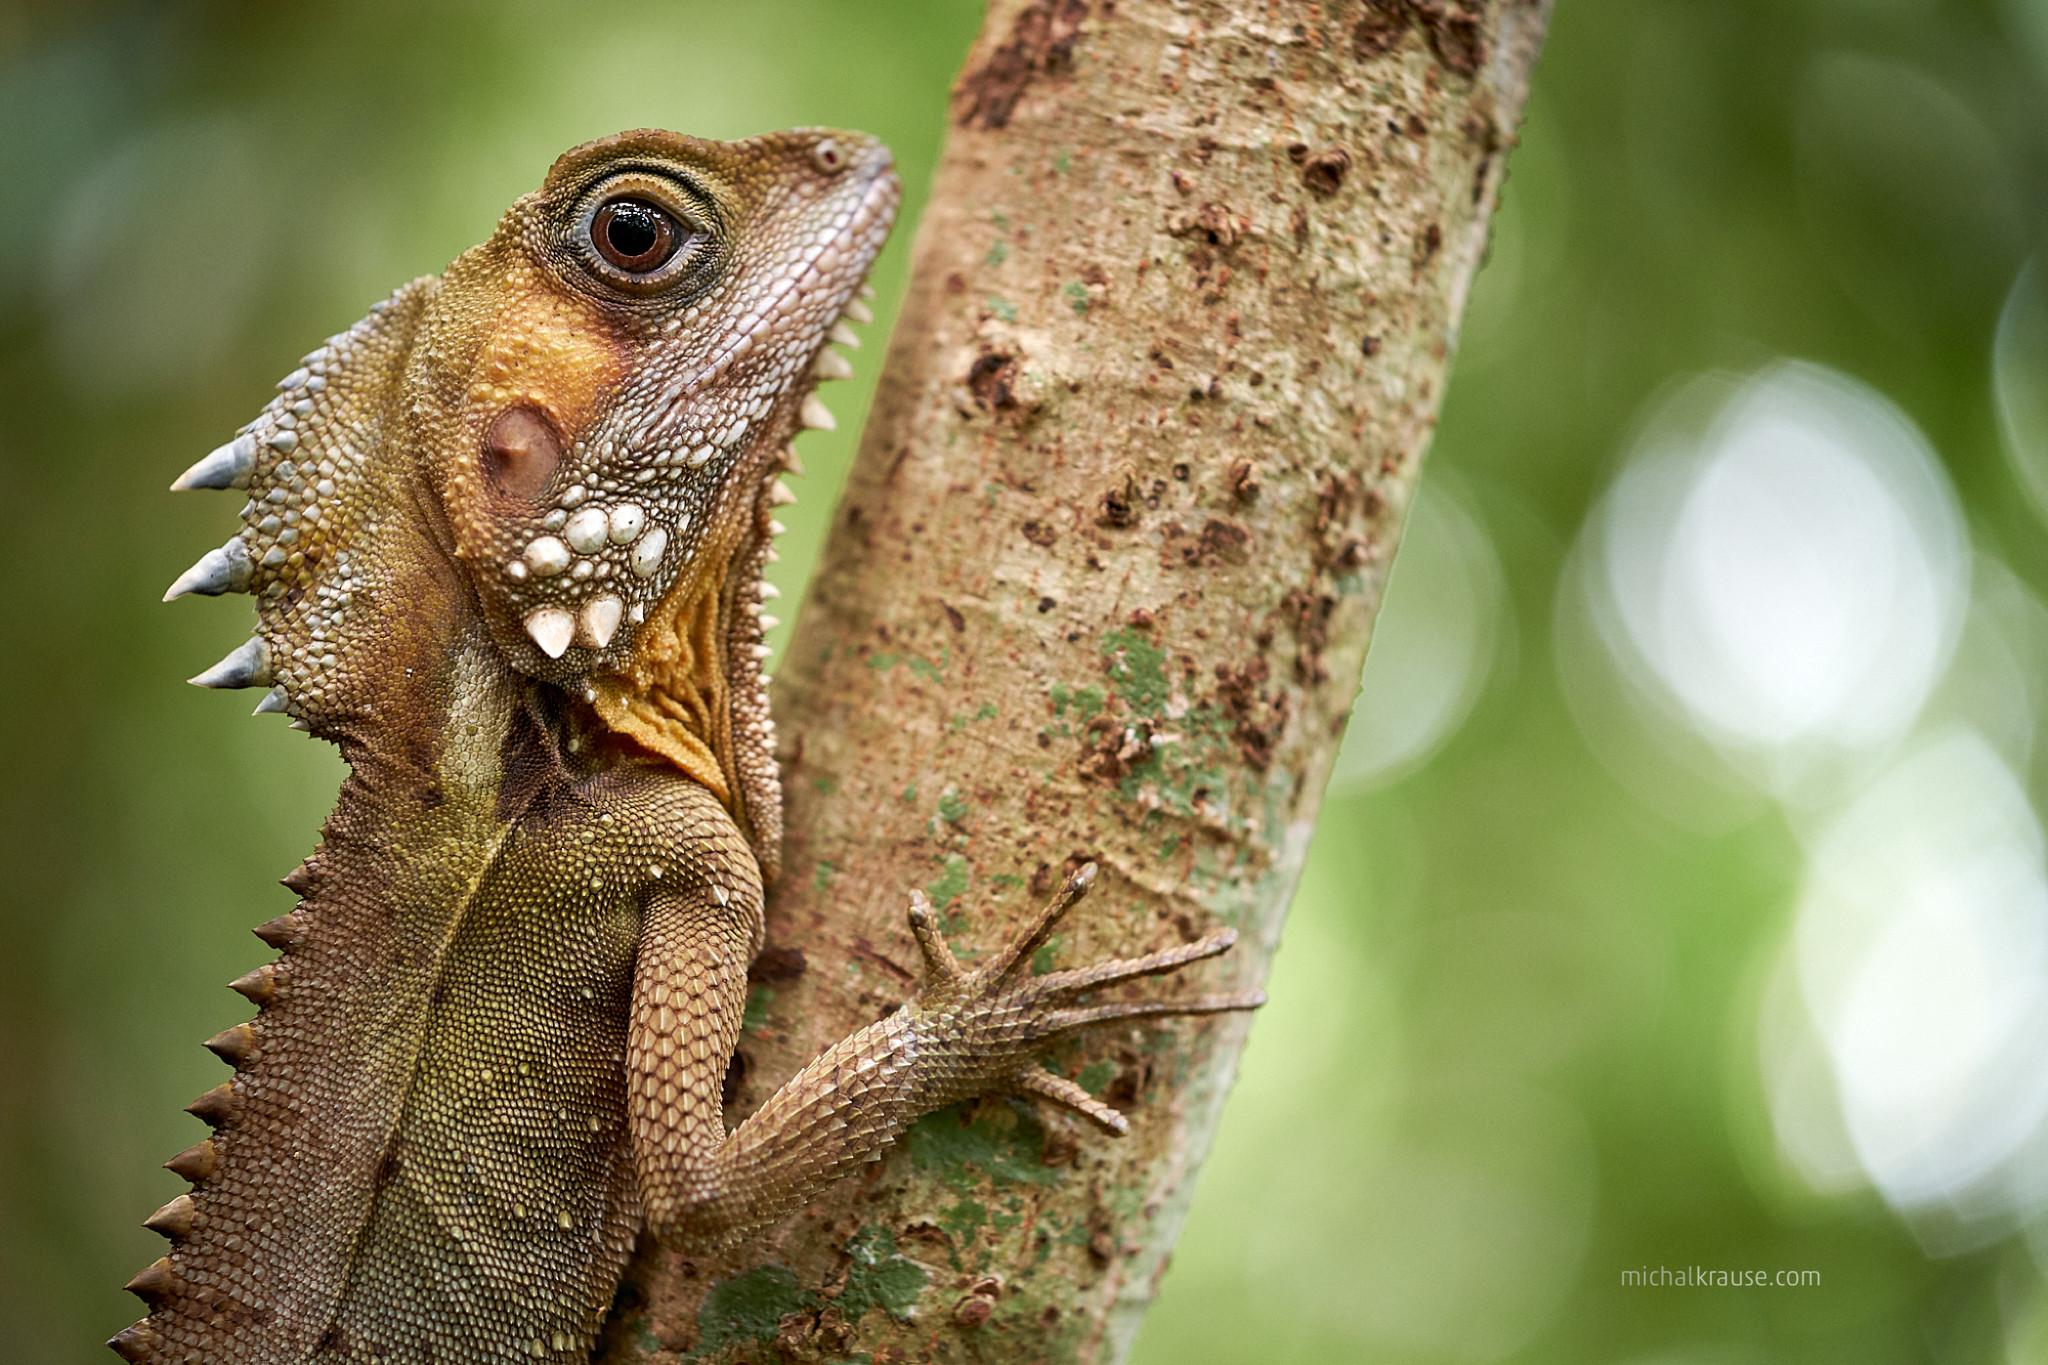
Fujifilm X-T2 + XF80mmF2.8 R LM OIS WR Macro (f/2.8, 1/34 s, ISO 1250, focal length 80 mm)
If you find some imperfections of this lens, it won’t be in sharpness – it is awesome. Some reviewers talk about sharpest lens for X system or consider it too sharp for portraits. I think that it is always easier to soften photos than make them sharper :) Sharpness of this lens is really wonderful and it is no surprise for me – Fujifilm knows how to do great lenses and macro lenses stand out usually.
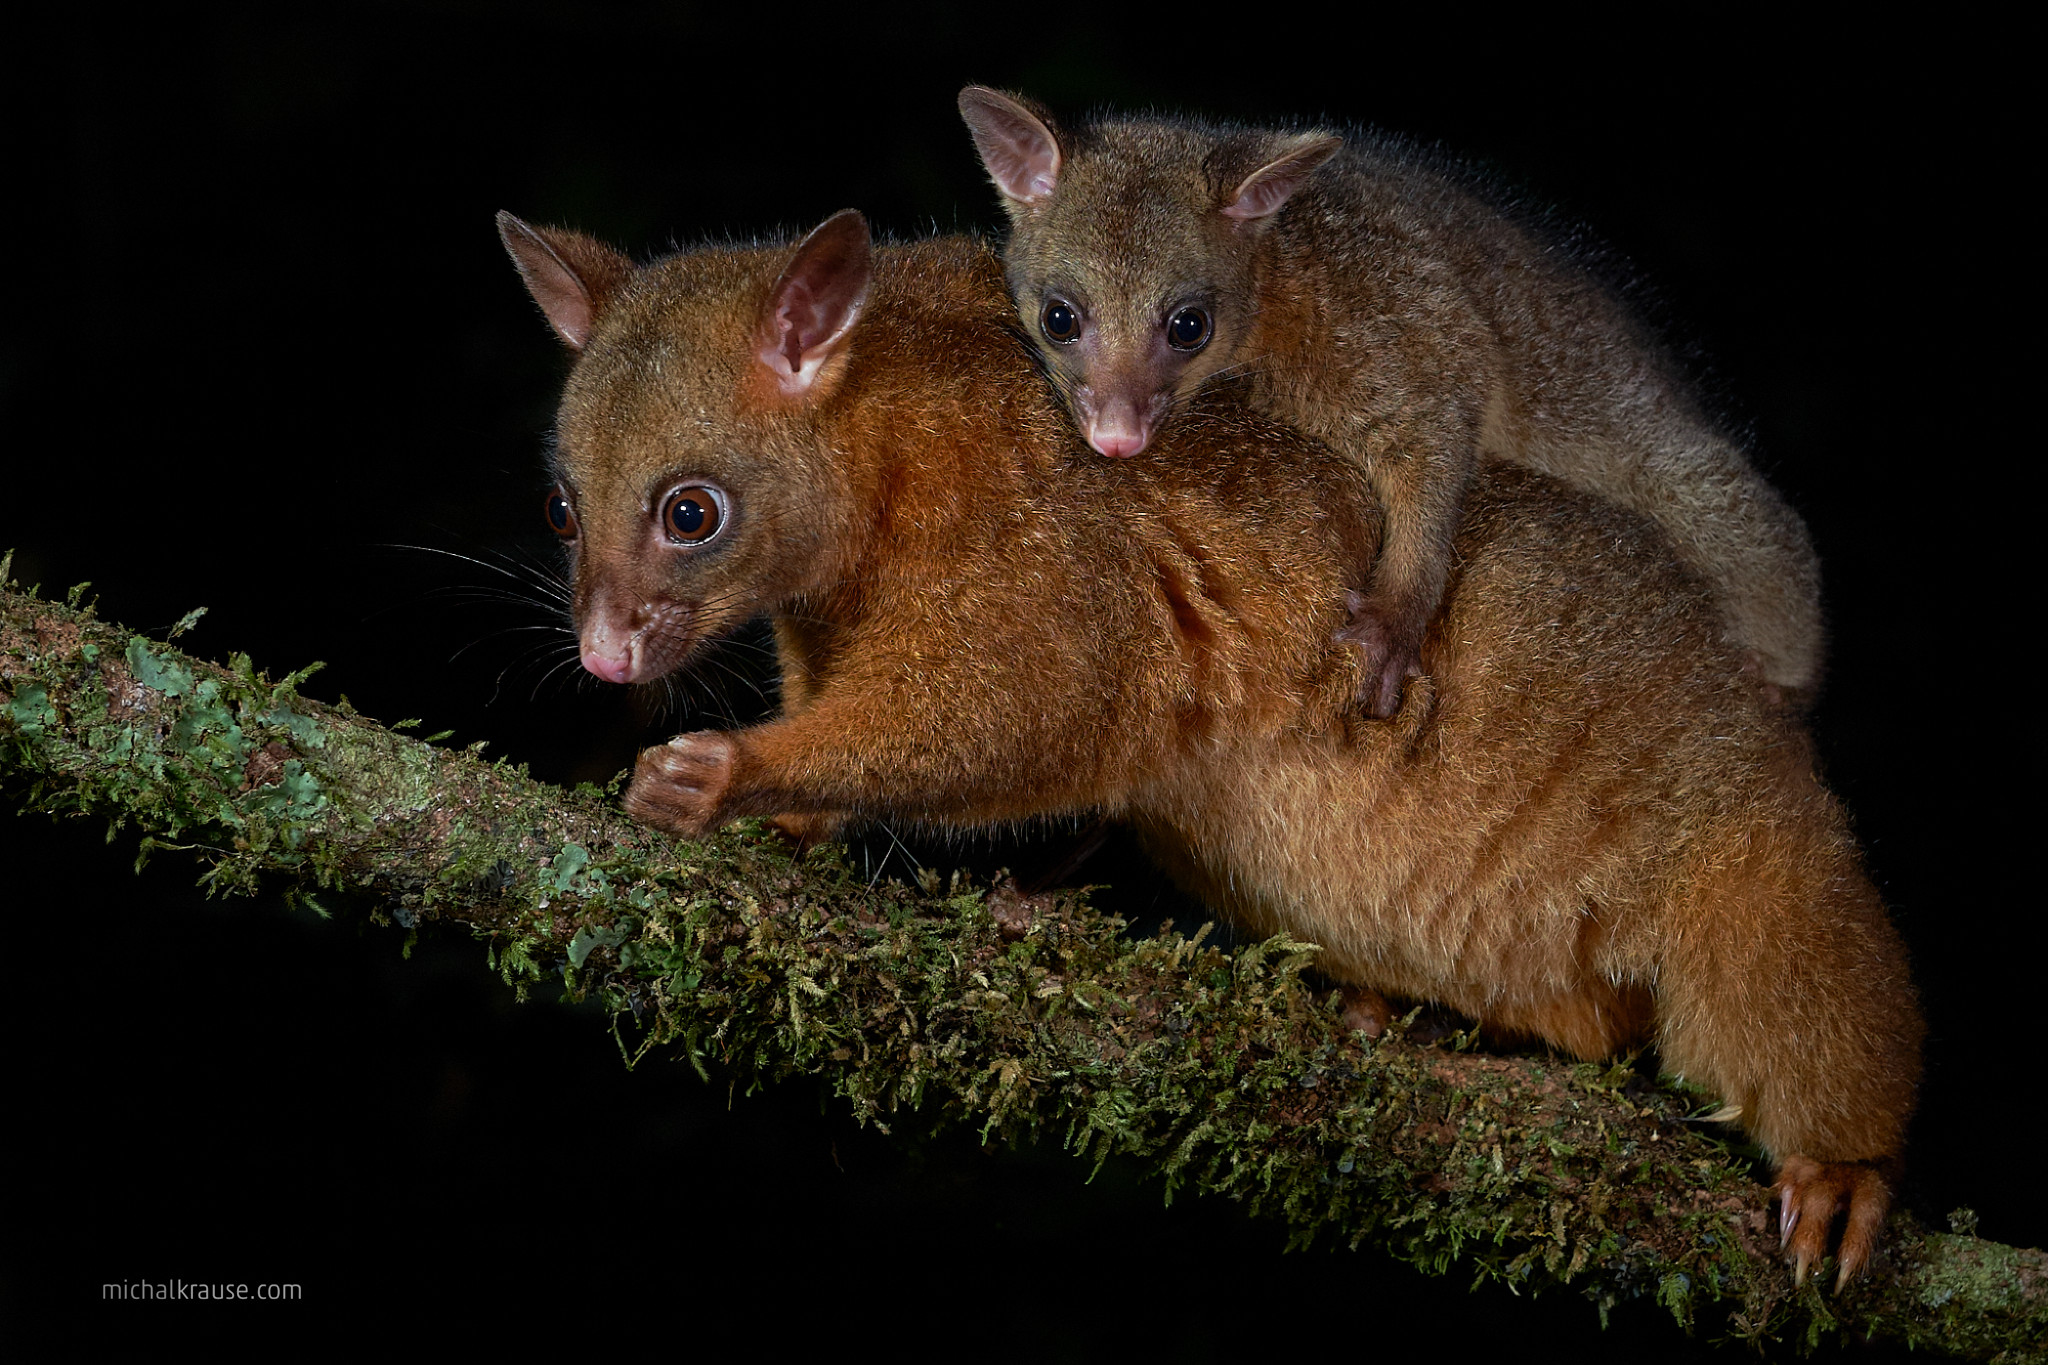
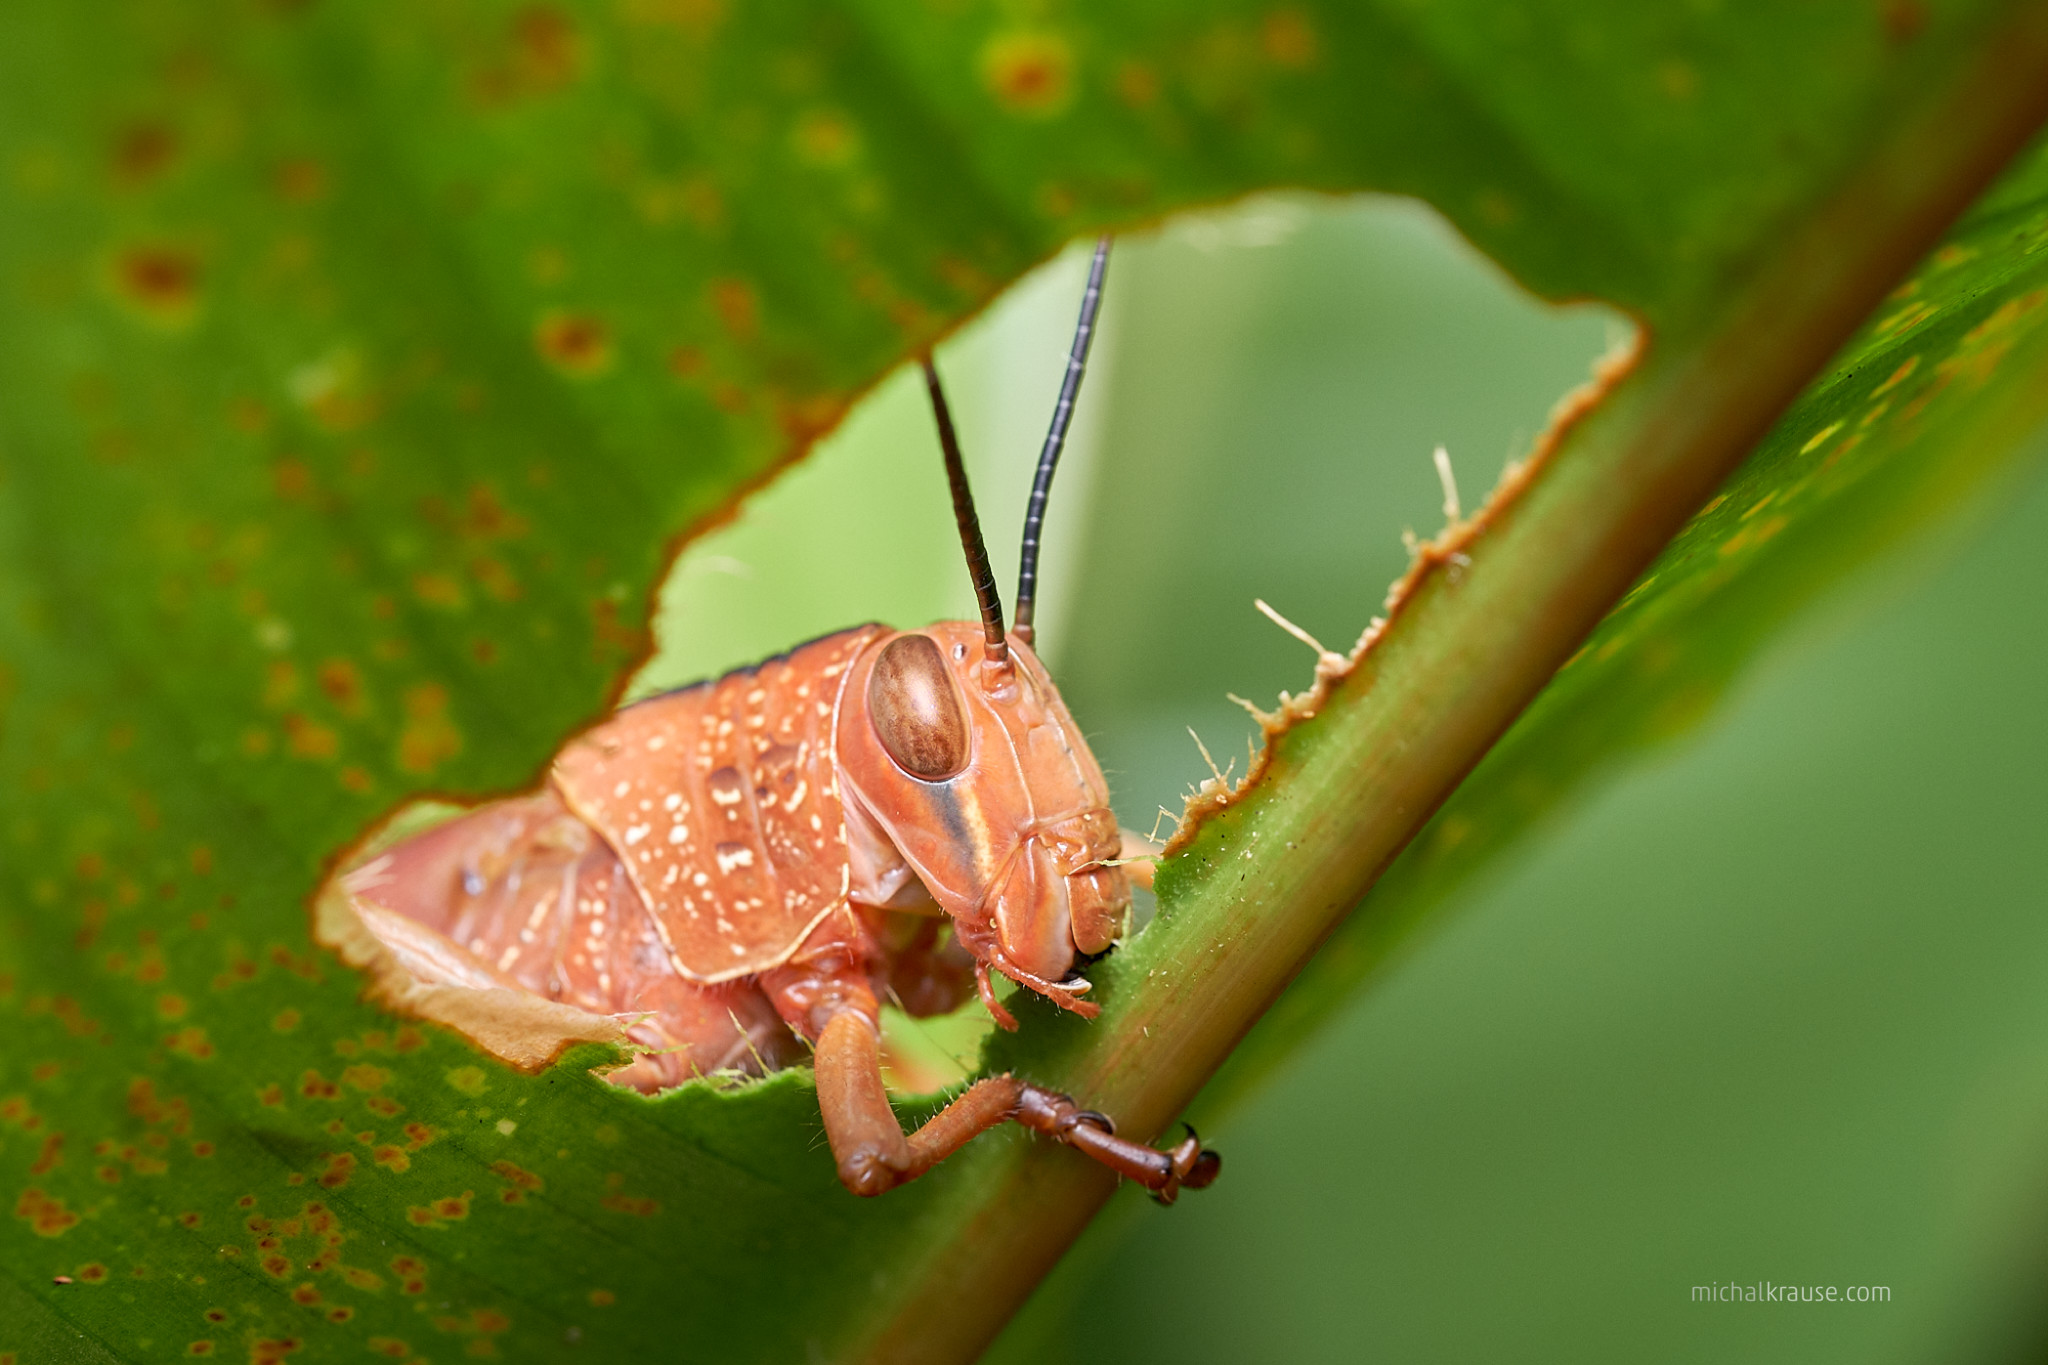
Fujifilm X-T2 + XF80mmF2.8 R LM OIS WR Macro (f/5.6, 1/160 s, ISO 1600, focal length 80 mm, flash)
Another important thing is rendering of out of focus areas. In macro range (where we fight with narrow depth of field) the background is smooth and beautiful typically.
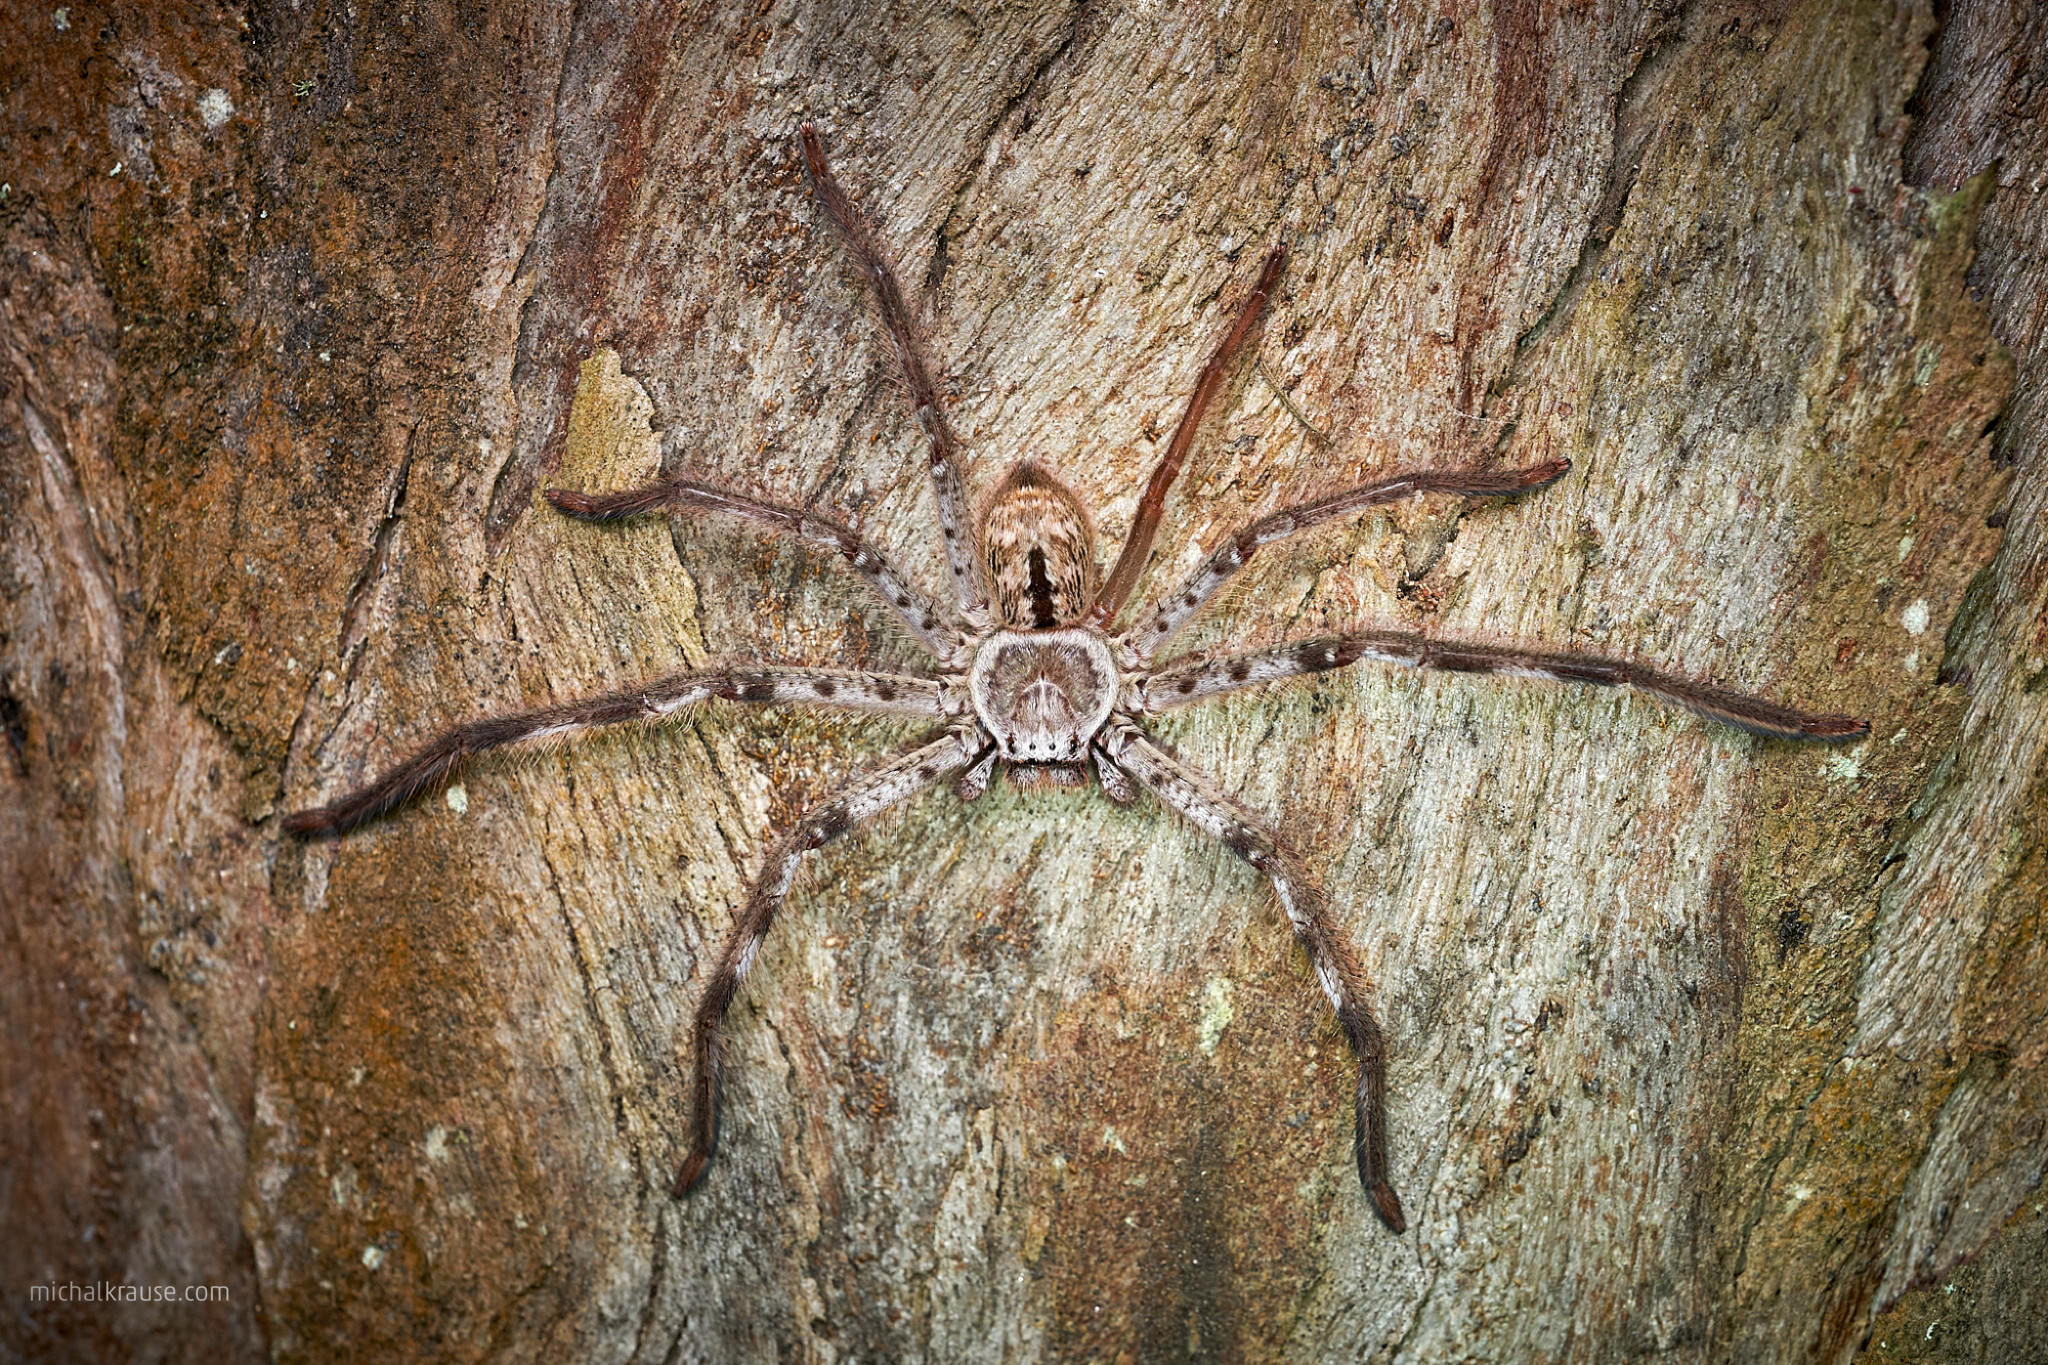
Fujifilm X-T2 + XF80mmF2.8 R LM OIS WR Macro (f/5.6, 1/160 s, ISO 640, focal length 80 mm)
Rendering of out of focus areas with more nervous background is a bit different and it depends on your taste if you will like it or not. The lens has a swirly bokeh similar to old Helios lenses. I am not a big fan of this effect, but I know that some photographers appreciate it – here is sample photo with intentionally selected background which emphasizes this behavior:
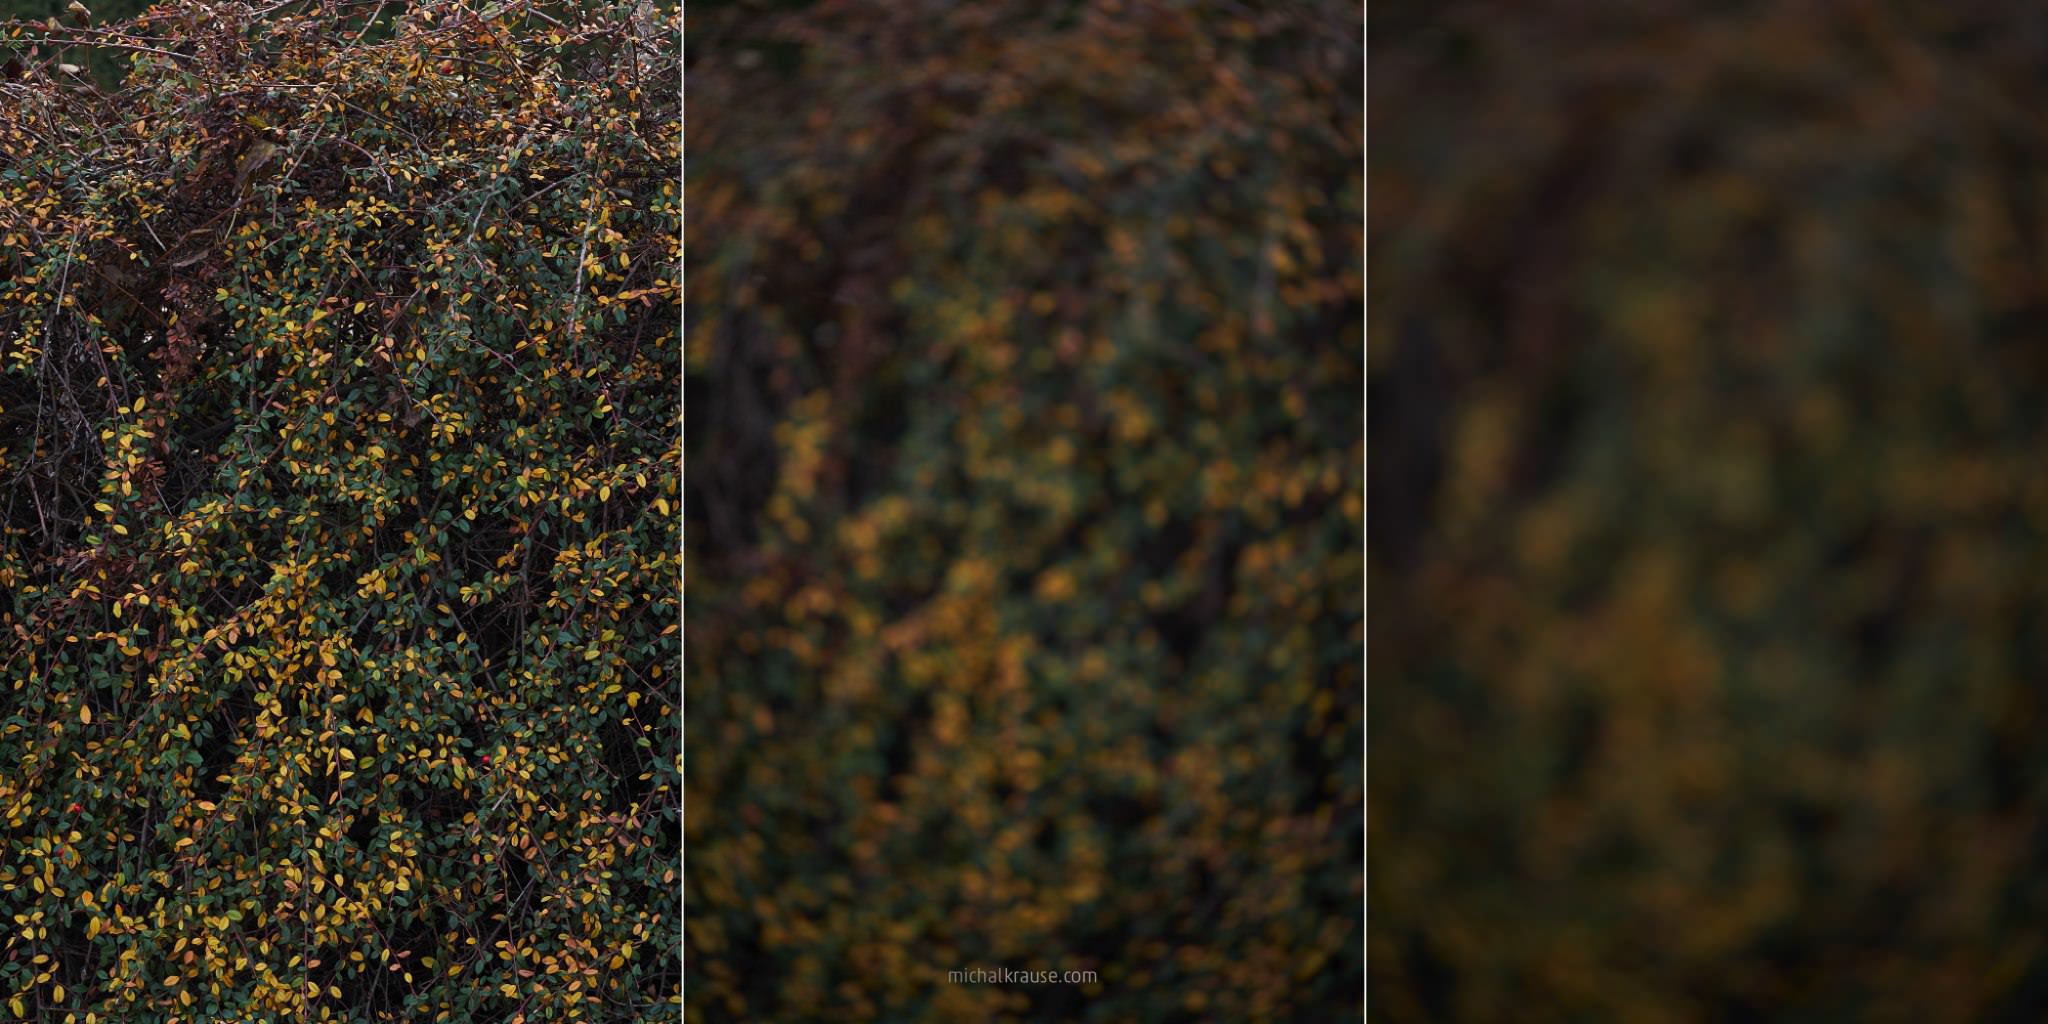
Nevertheless it seems to me you won’t notice this effect often. It doesn’t render in my macro photos and if you won’t have background similar to that on sample photo, it probably won’t show on portraits with wide open aperture too. Look at this example which I shot for comparison with portrait lens XF56mmF1.2:
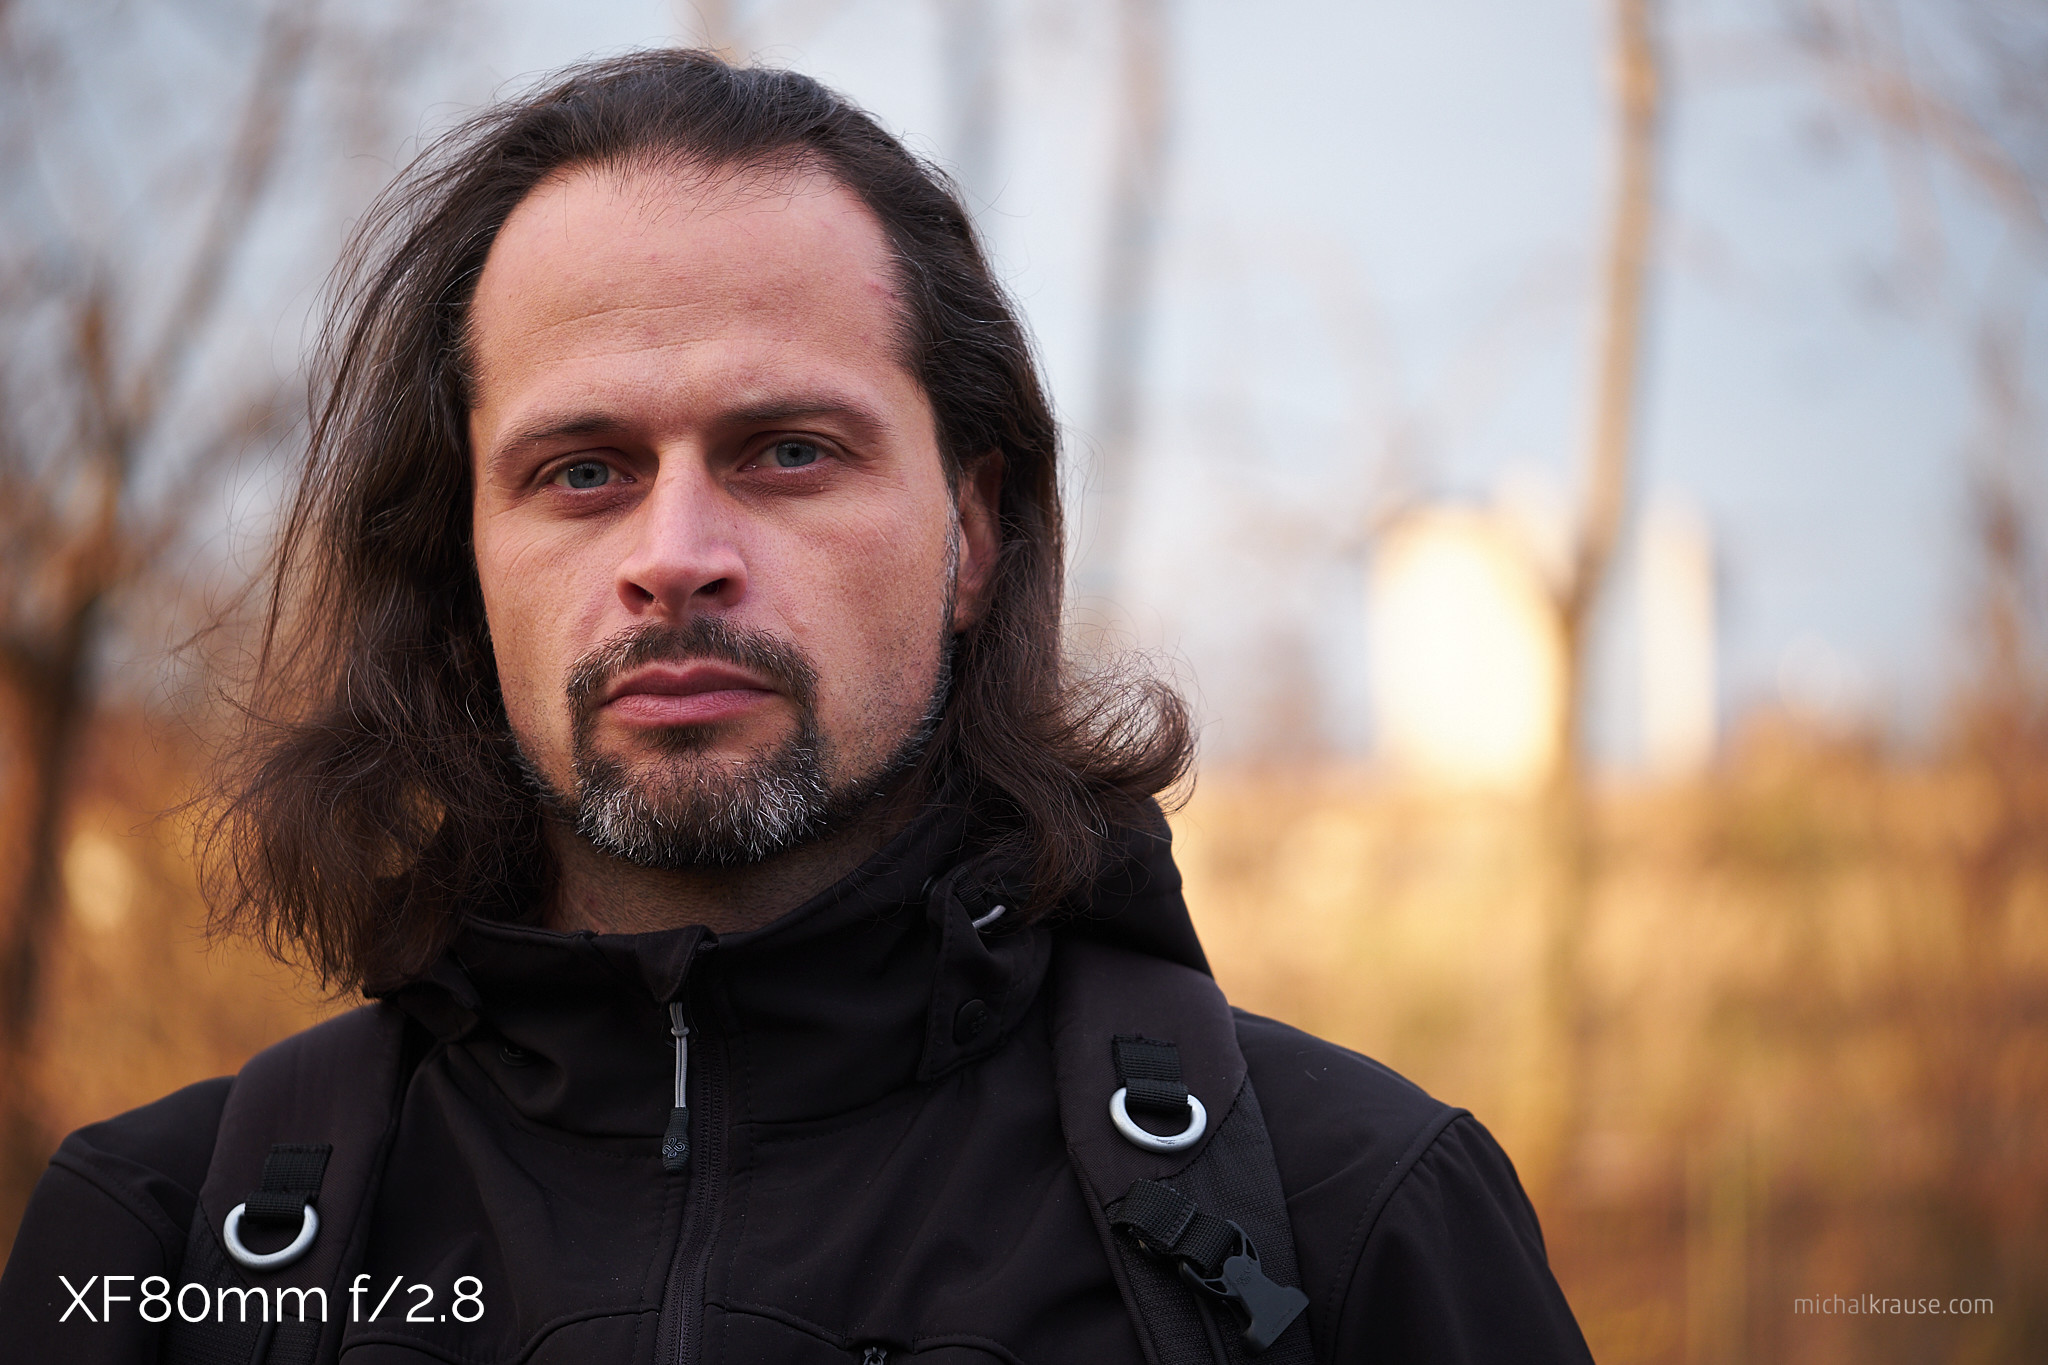
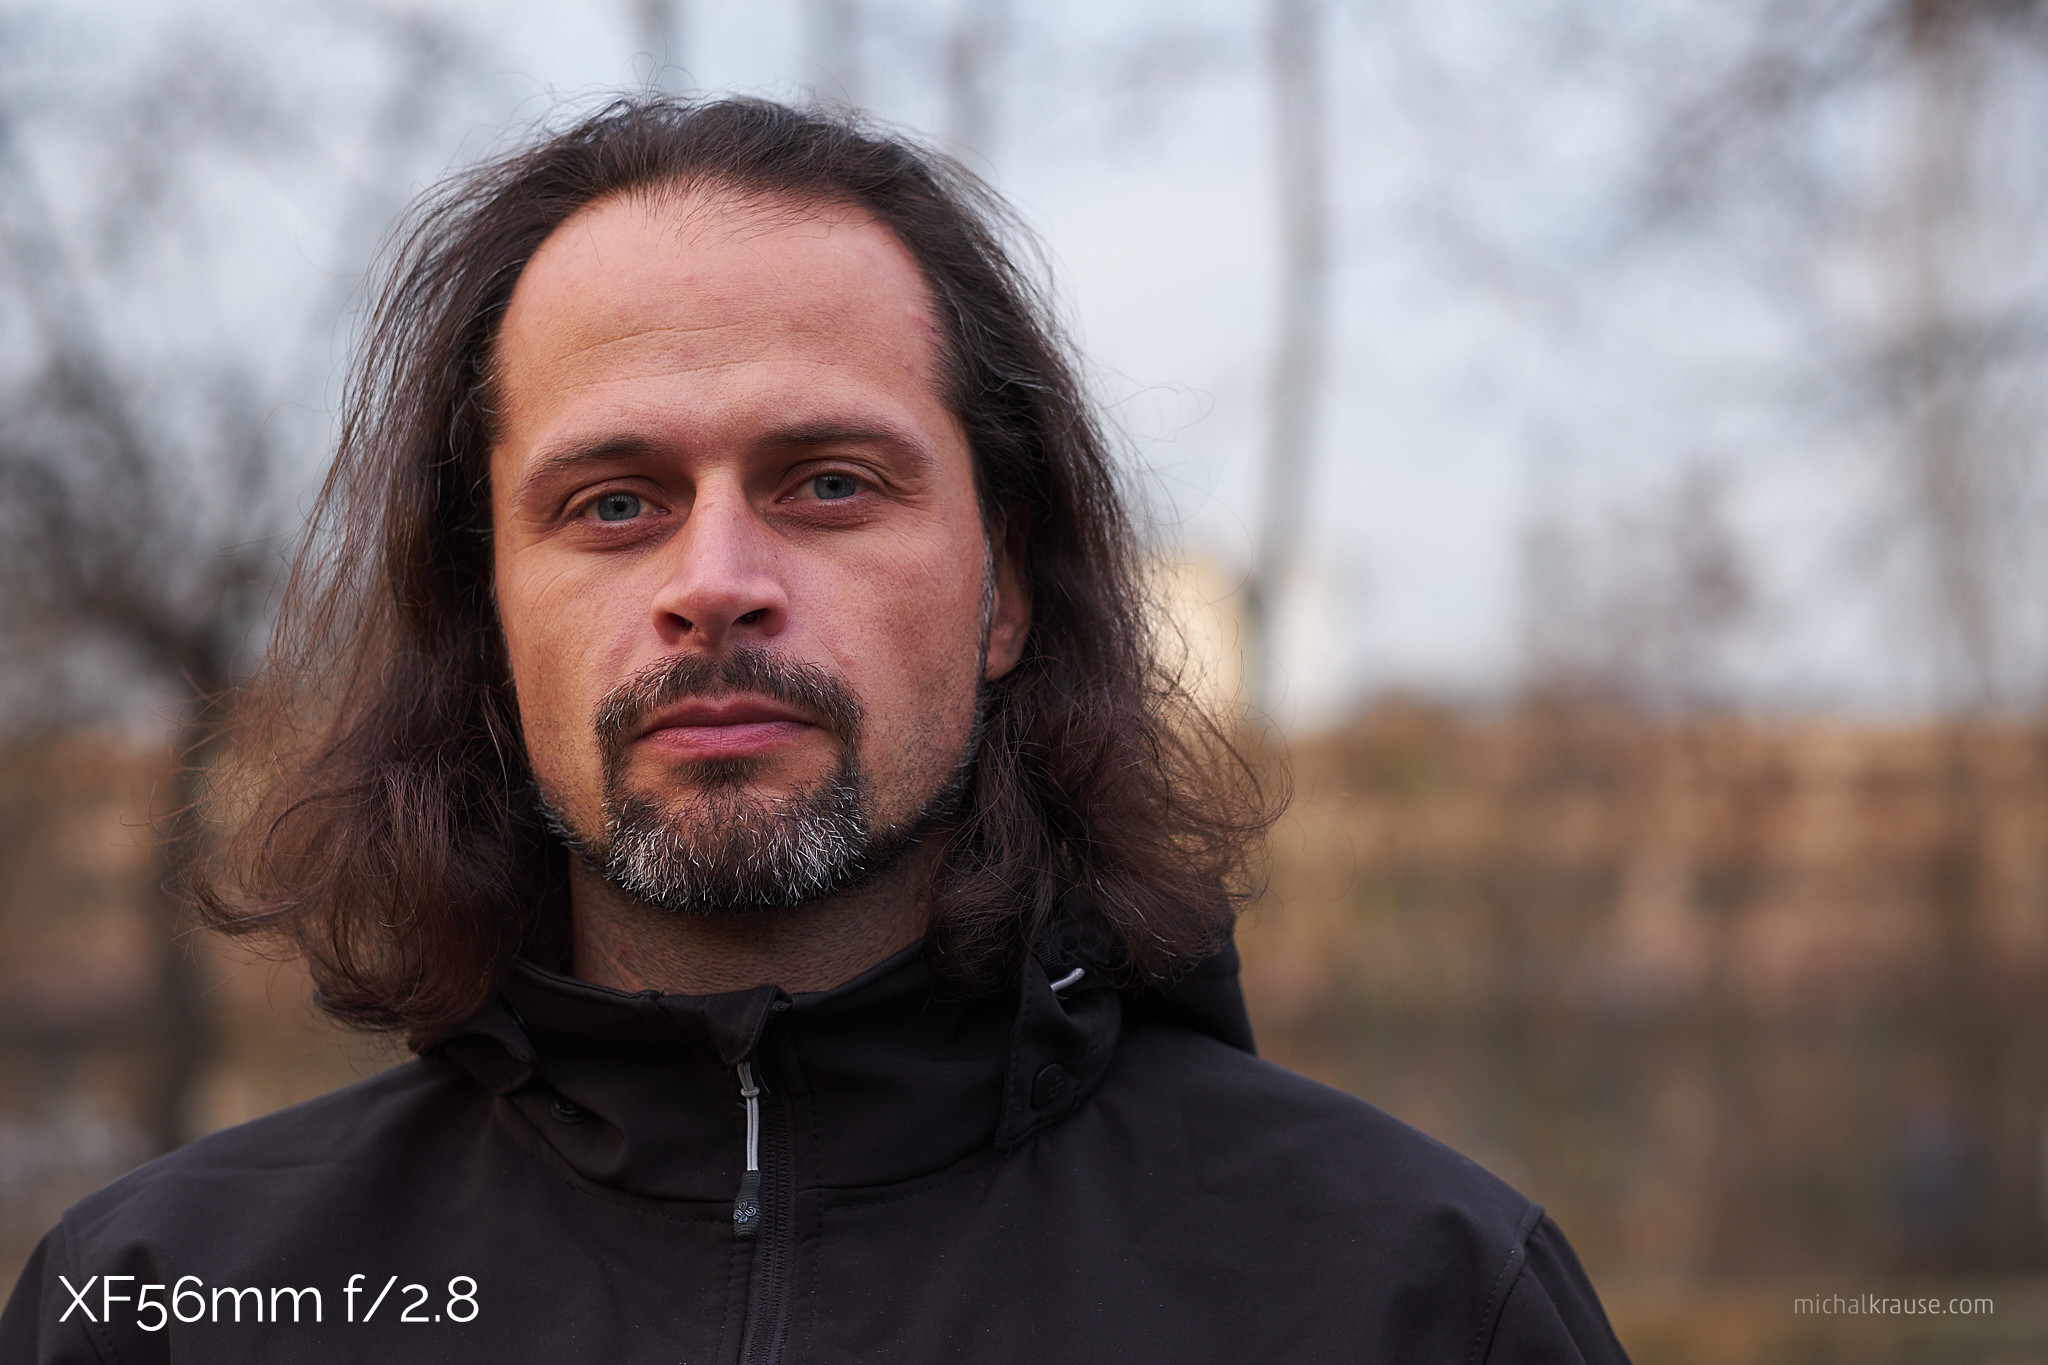
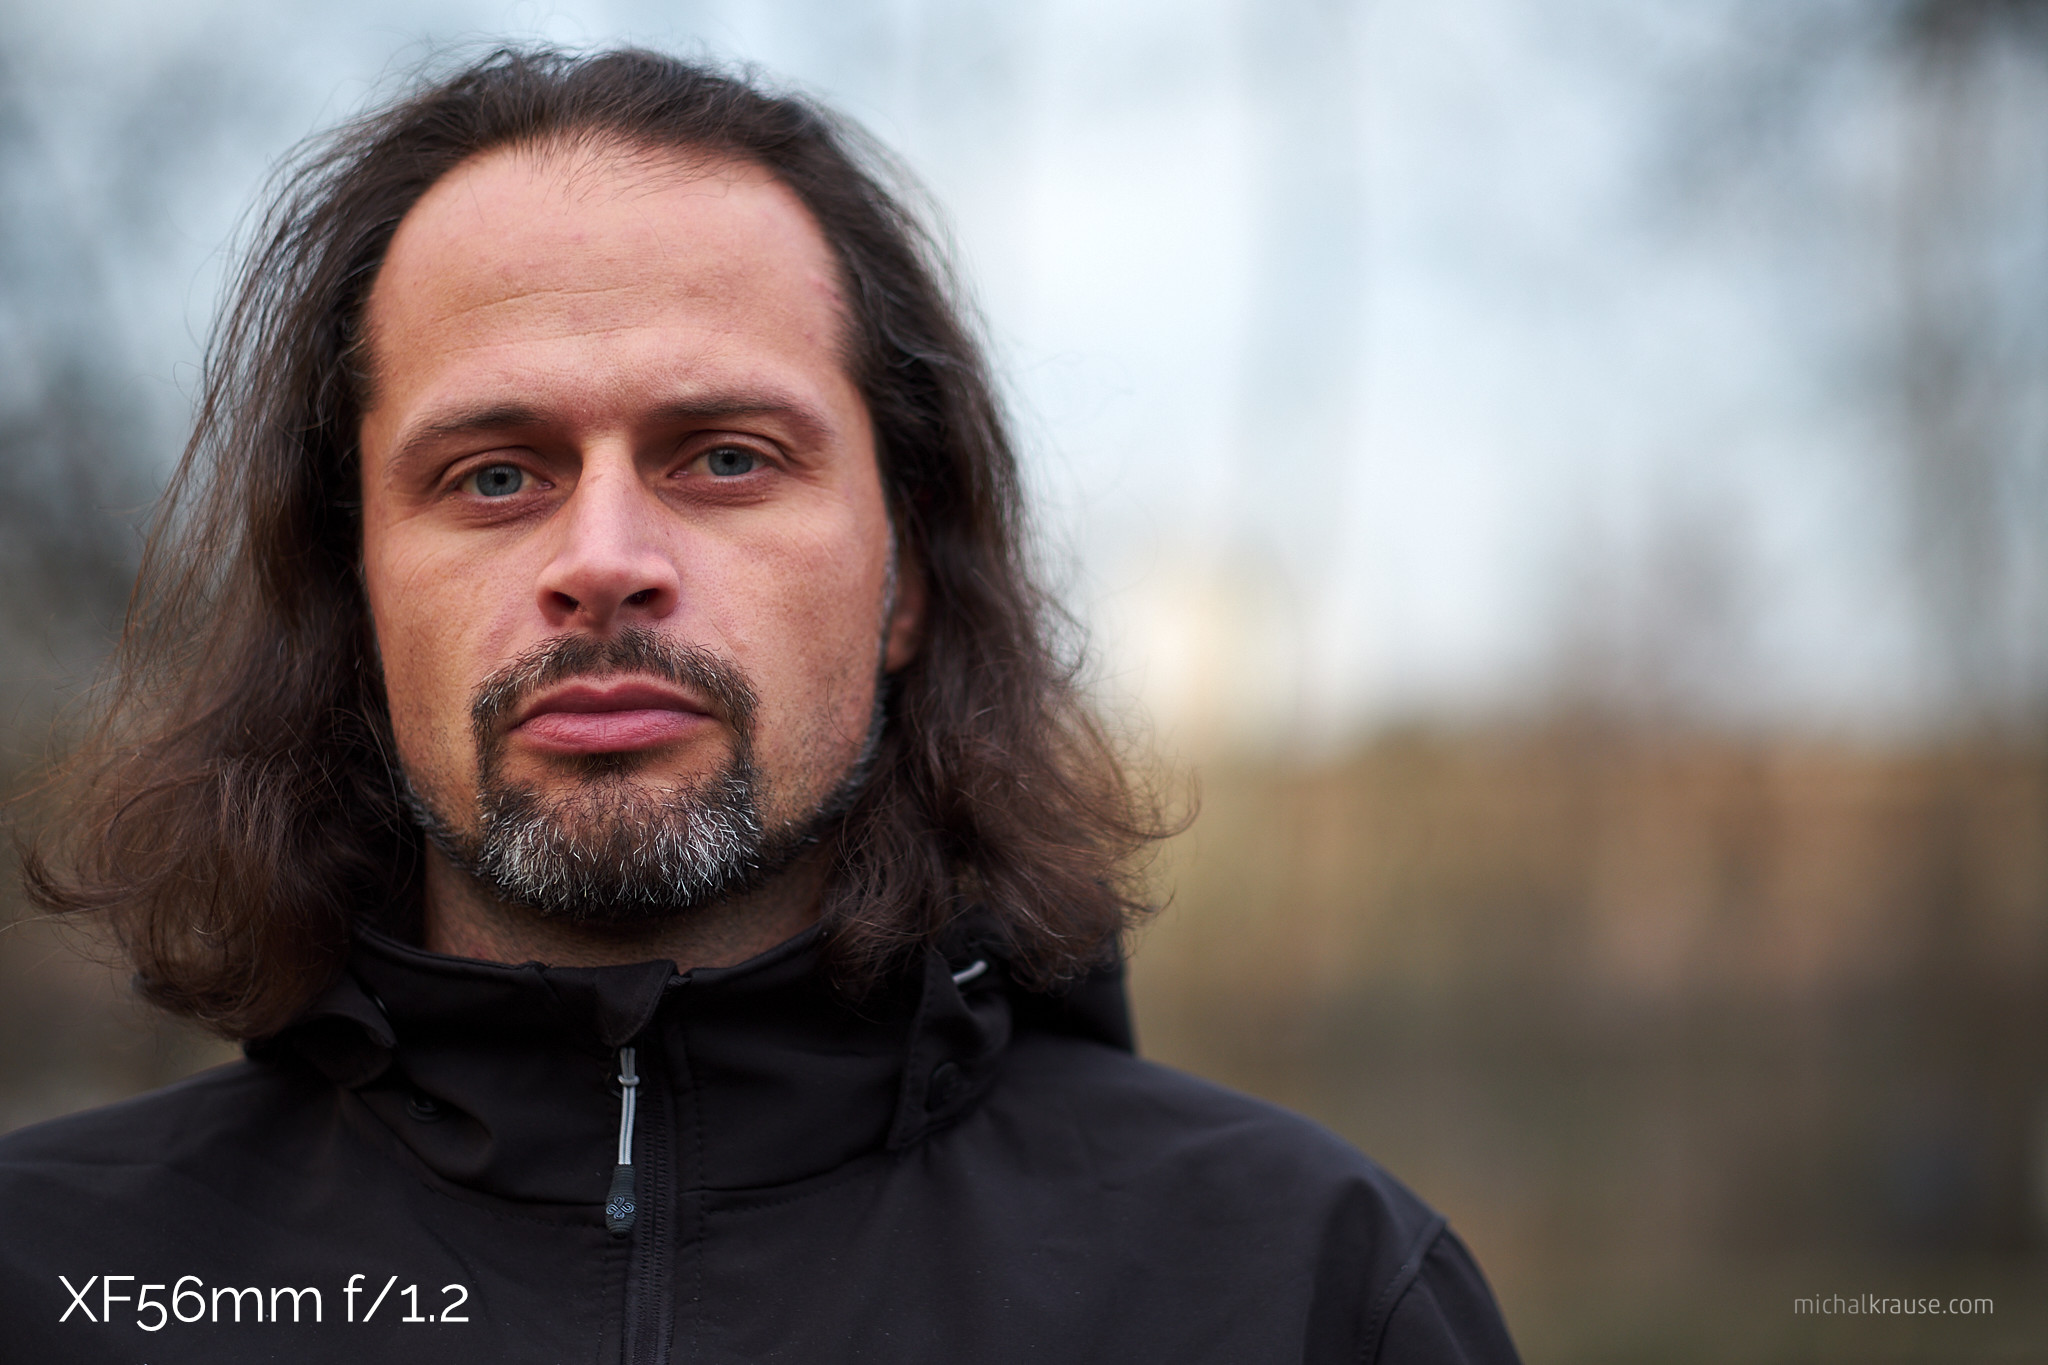
Please, excuse slightly different light and composition – I made these photos alone on the street using a mobile application and I had to move camera to achieve similar composition with shorter lens. I hope, it still could work as demonstration of XF80mm wide open portrait and comparison with faster XF56mm lens.
In terms of build quality, the lens is well made. Focusing ring runs smooth and works well for manual focusing. Autofocus is fast and quiet and you may use focus limiter with options for macro range from 0,25 to 0,5 meters, normal range from 0,5 meters to infinity and whole range from 0,25 meters to infinity. What can surprise you is element in lens which moves freely when lens is not attached to body. When you turn lens upside down, you can hear and feel movement of some not so small part inside lens. It is a bit worrying, especially because it occurs even if you switch to playback on camera, but it is normal and intended by Fujifilm engineers who probably know what they are doing :) For that matter, XF90mmF2 R LM WR lens behave similarly.
But back to build of XF80mmF2.8. The lens is weather and dust resistant so with X-T2, X-Pro2 or X-H1 it can be used in harsh conditions. During our Australian trip, we stayed for nine days in area with humidity so high that even items stored in bags turned wet after few hours and the lens worked perfectly.
Fujifilm X-T2 + XF80mmF2.8 R LM OIS WR Macro (f/8, 1/250 s, ISO 800, focal length 80 mm, flash)
What I find interesting is the ability to use existing XF1.4X and XF2X teleconverters. They are not usable with other prime lenses because they don’t fit mechanically – rear lens element would hit front TC element. Teleconverters can be used for reaching higher magnification ratio (1.4:1, respective 2:1) or longer working distance. Unfortunately, I didn’t test these combinations so I cannot comment impact of converters on optical quality or functionality.
My main (and only) reservation about this lens is its weight and size. I am trying to keep my gear minimal in terms of quantity and total weight and size. XF80mm lens is as big as its full frame counterparts – it is similar to them in term of dimensions and weight. For comparison, Nikon 105mm f/2,8 G AF-S weighs little bit more (790 g), while Canon EF 100mm f/2.8L Macro IS USM is even lighter – it weighs 625 g only.
Fujifilm X-T2 + XF80mmF2.8 R LM OIS WR Macro (f/9, 1/250 s, ISO 1250, focal length 80 mm, flash)
Shooting with XF80mmF2.8 macro lens was pure joy – it is really sharp, it can reach 1:1 magnification (or higher with converters or other accessories), OIS is a big advantage and it focuses fast and quietly. I am not a big fan of swirly bokeh, but I have to say, that it took some effort to show you this effect – it is not visible in many common situations.
To buy or not to buy this lens? The answer is simple: if you focus on macro photography, this is the best choice at this moment in my opinion. Had it not been for my plans to focus more on wildlife of colder areas after three trips to tropical forest last year, this lens would find its place in my bag (with gritting my teeth because of its weight). But I will be shooting macro occasionally and thus XF60mmF2.4 lens will fit my needs for this year – it is really tiny and lightweight (it weighs 215 g only!) and its focal length perfectly complements my other lenses – XF16mmF1.4, XF23mmF1.4 and XF100-400mmF4.5-5.6.
I would like to thank FUJIFILM Europe GmbH for lending me the lens.
If you like this article and want to support my work, you can buy your gear on Amazon using links from this article or following ones:
Macro photography and camera sensor size
There are many misconceptions of an impact of sensor size in macro photography. Here are some informations, whose may make it more clear.
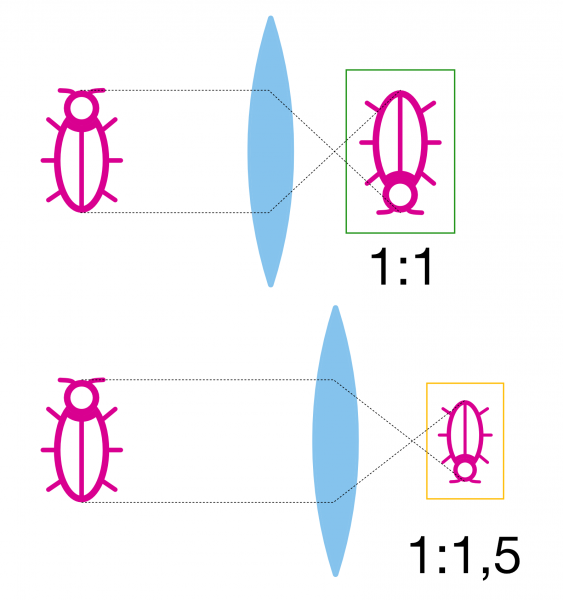
First of all, the reproduction ratio describes relation between the size of real object and its picture on camera sensor. So, if macro lens allows to shoot at ratio 1:1 and is used on full frame camera, object of size 36×24 mm will fill whole frame. When you use 1:1 lens on APS-C sensor, it captures area of 24×16 mm (approximately, real crop of these sensors are not exactly 1.5, but something between 1.52 for Fujifilm or Nikon and 1.6 for Canon). It means that even if we shoot at 1:1 reproduction ratio in both cases, we capture closer detail with smaller sensor camera, as shown in following diagram:
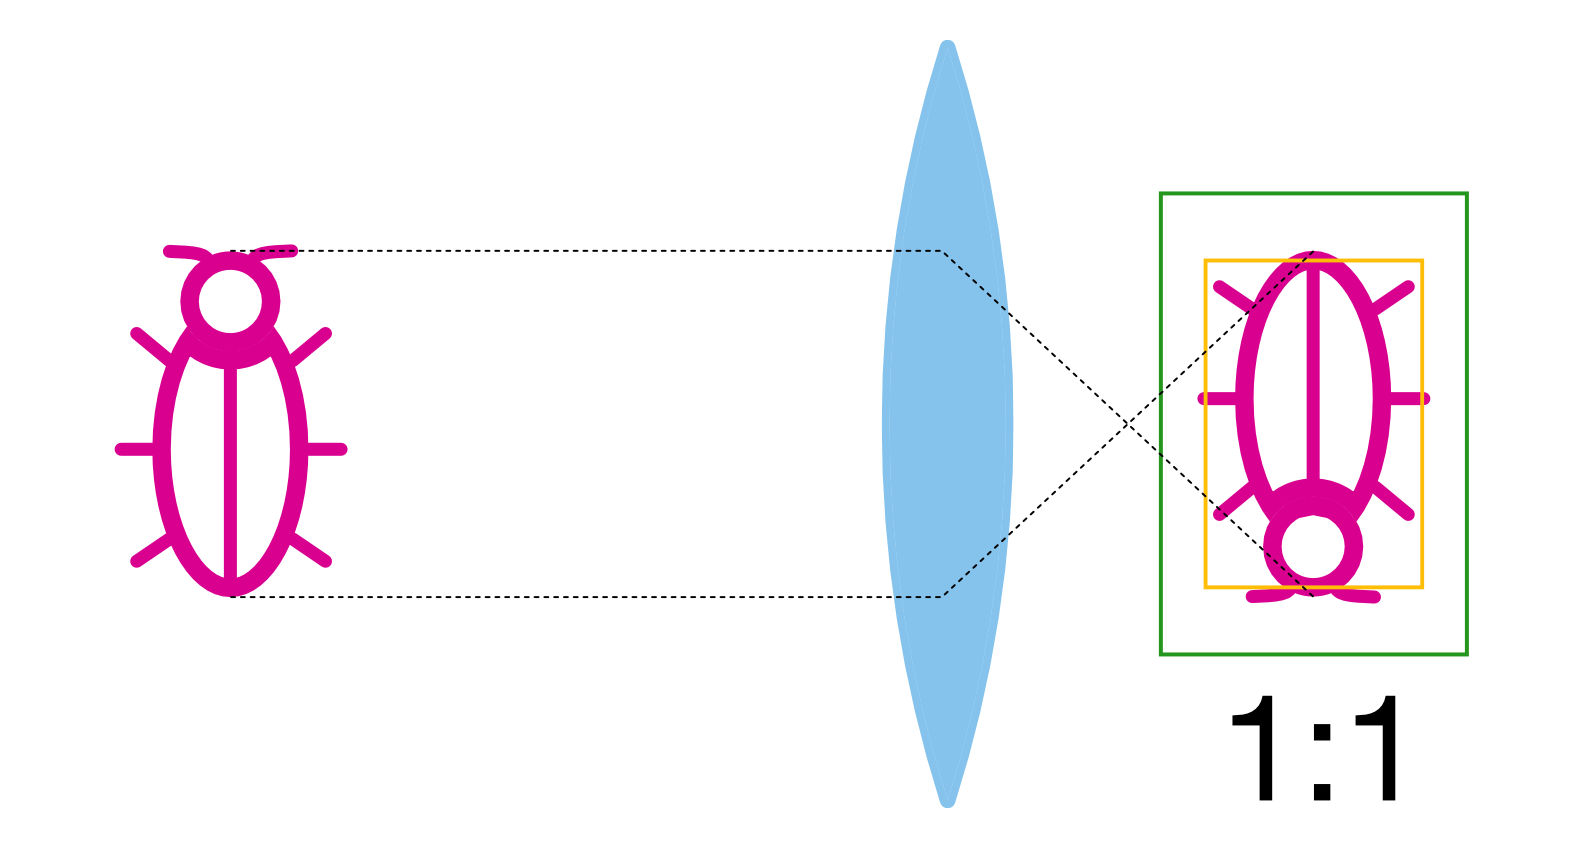
As you can see, smaller sensors can be convenient when you want to achieve relatively higher magnification – or simply said, if you want to fill whole frame with smaller subject. Or vice versa, we can say, that XF60mmF2.4 lens mentioned earlier with magnification limited to 1:2 can fill whole APS-C frame with object 48 mm long, which is only about 1/3 more than 1:1 lens can achieve on full frame.
You may oppose, that it is possible to achieve the same result by cropping resulting photo and it is true – to same extent. The problem is, that you lose lots of pixels by cropping to the same size. Crop factor 1.5 means that final resolution lowers by factor 2.25 (1.5 × 1.5 = 2.25), so to get 24 megapixels after crop like X-T2 have, you need 54 megapixels photo from full frame.
Many confusions also exists about the depth of field. It is calculated using the following formula in the macro range:
DOF = 2 × f-number × CoC × ((magnification + 1) ÷ magnification2)
As you can see, there is neither focal length nor sensor size in formula (but it has to be said that both are indirectly represented in magnification ratio) – most important is f-number and magnification. CoC parameter is essential too – it is maximum permissible size of circle rendered instead of perfect point for out of focus areas before it will start to look blurred to human eye. We usually use a value of 0.03 mm for full frame sensors and 0.02 for APS-C sensors. For example, depth of field for 1:1 magnification ratio and f-stop 8 is:
for full frame: 2 × 8 × 0.03 × ((1 + 1) ÷ 12) = 0.96 mm
for APS-C: 2 × 8 × 0.02 × ((1 + 1) ÷ 12) = 0.64 mm
You may be surprised, that depth of field on APS-C sensor is smaller at the same reproduction ratio! But don’t forget that photos from both systems will be different as indicated by previous diagram. We can get similar composition by shooting at smaller magnification ratio 1:1.5 on APS-C sensor:
Then the result of formula looks different – with similar field of view the depth of field will be higher on smaller sensor:
for APS-C at 1:1.5: 2 × 8 × 0.02 × (((1 / 1.5) + 1) ÷ (1 / 1.5)2) = 1.2 mm
As you can see, comparing cameras with different sensor sizes is not as straightforward as it seems. Fortunately, it’s not rocket science either – main things you need to know are:
- smaller sensor allows you to capture smaller area at the same magnification ratio so you can capture closer detail
- depth of field of smaller sensor camera will be higher in comparison with full frame camera for similar field of view
- however, if we compare photos made with the same reproduction ratio on camera with different sensor size, then the smaller sensor camera will have smaller depth of field because of smaller maximum acceptable size of circle of confusion (but again, in such comparison, photos from both cameras will have different field of view as indicated in first diagram of this theoretical part of article)
For these reasons (the possibility of capturing closer details and relatively higher depth of field), some macro photographers may prefer APS-C cameras.